Monday, December 24, 2007

Merry Christmas!

Sunday, December 23, 2007

Altered Wooden Dominoes

Need some last minute ornaments? Some cute gift tags?


I found these great 1"X 2" wooden dominoes in the $1 spot at Target recently. (you can also find similar size wooden items at most craft stores) With some Wrapped Wishes paper scraps, Ribbon Elements and Clearly Petite Stamps you can easily make a dozen or so in very short time.


Here are some simple instructions to make your own:
  • Sand and cover each Domino face with a light layer of decoupage medium, cover with a pattern paper scrap and brush medium over the paper to seal. (set aside to dry while assembling the next one.)

  • When dry, trim away excess paper from sides of domino. Sand if you like, and ink edges. (*Note that mine have been double inked in contrasting colors.)

  • Using an ink pad suitable for smooth surfaces; ink and stamp using Happy Holidays Clearly Petite Sentiment Stamps

  • Mask off the sentiment using a Post-It (this part is optional, Learn how to mask HERE) and stamp the snowflakes and Dainty Swirl using Clearly Petite Image Stamps

  • At this point you can varnish or apply a final coat of decoupage medium to seal the piece. (* again this is optional, if you heat set your ink it should be fine.)

  • apply liquid glue to edge of domino and roll edge in fine glitter.

  • Embellish front with rhinestones, sequins or glitter glue of your choice.

  • Attach a ribbon loop to back using a strong dry adhesive.


And VOILA!

Have a Happy Holiday!

Heidi Smith

Saturday, December 22, 2007

Paper Flowers...


i used ribbon elements paper ribbon to create the flower on this card ...


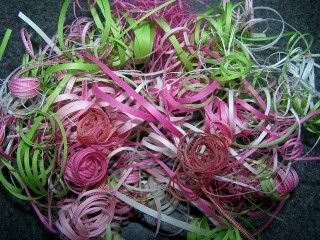
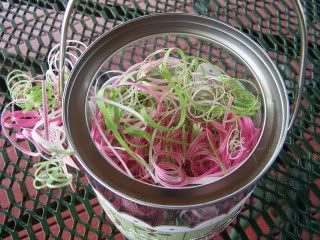
the first step is to use a small square of double sided tape to adhere 2 pieces of ribbon together, forming an "X"...


next, tear the ends of the ribbons into small strips...


then, using a pair of scissors, curl each strip; work carefully so you don't tear them!


finally, spread out and arrange curls, and use a pop dot to add a button at the center


i also used ribbon elements paper ribbon to add the leaves and "stem" of the flower

the sentiment was stamped using clearly petite alpha stamps

by...tami sanders - daisy bucket design team member


Daisy Bucket Decorations

I had fun creating Christmas decorations with the Ribbon Elements from Daisy Bucket.
To start, I created a candy jar with paper from the Garden Gate collection and I embelished it with Paper Elements Ribbon.


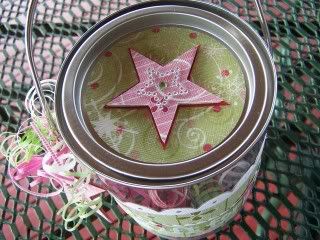
I also created Christmas ornaments with rub-ons and Ribbon Elements.

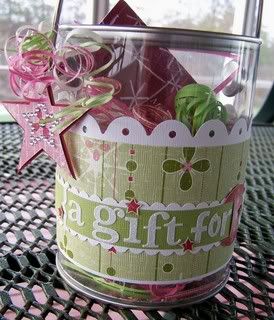
These would make wonderful gifts for your child's teacher, friends and family members.

I hope that my projects have inspired you to create some projects for the Holiday Season.

Mélanie Blackburn Daisy Bucket Design Team Member

Thursday, December 13, 2007

{Love You} Sneak Peak


Just wanted to share a little teaser before the full release tomorrow for our new {Love You} collection that starts shipping next week! 6 new papers, a new tag element and 14 new stamps. Enjoy!

Featured Layout

We have been keeping an eye out for layouts that are created with Daisy Bucket products.

I've recently came across this layout by Julie Bond from Sept-Iles (Québec, Canada) and I just had to share it with you. I love how Julie used the Whimsical Ladies paper line to create a warm and cozy layout. Julie has also take the time to cut out the flower pattern from the pattern paper to create beautiful embellishments. Julie also accented her layout with "fake" snow which tied in perfectly with her title "Chatleur Hivernal" - which translates to "a cat's warmth in winter". Beautifully done Julie!

Make sure to keep on uploading your Daisy Bucket creations to blogs and galleries. You never know when we could approach you to feature your layout on the Daisy Bucket blog.

Happy Scrapping!

Mélanie Blackburn DT member

Tuesday, December 11, 2007

Wrapped Wishes Gift Card Bucket!

Photo Sharing and Video Hosting at Photobucket

What a great way to say Happy Holidays to a special person than with a gift card (or other small sized gift) presented in a beautiful way! I had so much fun working with these awesome papers from the Wrapped Wishes collection by Daisy Bucket. I loved the nontraditional Christmas colors, the super cool paper texture and the fun designs.
http://www.daisybucket.com/lines/wrappedwishes/wrappedwishes.html

Photo Sharing and Video Hosting at Photobucket

Photo Sharing and Video Hosting at Photobucket

In fact, this month I got doubly lucky, because I received these amazing papers and fun embellishments in an amazing kit... from http://www.scrapdango.com/ It's their December kit, you should check it out!

I made this gift card holder, "a bucket of fun", with the papers, ribbons and tag elements! I added a little bling, some cool glittery letter stickers and a star and here is the finished product.

But the most fun part of all was working with the Daisy Bucket RIBBON ELEMENTS! http://www.daisybucket.com/ribbonelements.html

I love working with this paper ribbon, so versatile and different from any other product out there. Here are the ribbons in all of their shredded and curled glory.

Photo Sharing and Video Hosting at Photobucket

I cut one yard lengths of pink, green and off white, pulled them apart into skinny pieces, then curled them with a pair of scissors. They make an festive and colorful filling for the inside of my bucket.

Photo Sharing and Video Hosting at Photobucket


AND, the ribbons also make a fun embellishment to add to the handle... with a star hanging from them.

Thanks so much for looking and Merry Christmas!

~ Dana DiGennaro

posted by Dana D at 8:11 AM 0 comments

Saturday, December 08, 2007

Another way to use Daisy Bucket Designs Ribbon Elements


For this layout I cut two, 9" strips of the bright green ribbon Elements and separated them into 3 equal sized parts. I then took my 1/8" hole punch and punched a bunch of holes around the smaller blue paper (two holes 1/8" apart - every inch or so)...I then took the ribbon strips and wove them through the holes in the paper. I was rather surprised at how easily they threaded through the paper...I really love the versatility that these ribbon elements have to offer.....What can you make with them??

~Amanda B.